
Configuring Azure Synapse Linked Service with System-assigned Managed Identity
Microsoft Azure has its own data warehousing solution and that is called Synapse and it provides a heurestic solution to uncover your data into various forms, link them with different services, ETL and more. Though its a great solution but sometimes becomes challenging when things does not go as expected like creating a Linked Service with System-assigned Managed Identity.
This blog is one of my customer’s experience where he was not able to create a Linked Service – a feature within Synapse to connect with other Azure services e.g. Blob, SQL – using a System-assigned managed identity. The customer has a private network and fully isolated from public, however, he was able to access the Synpase but just only this Linked Service was not getting created and that made me frustrated when he first reported to me.
Well, as a part of my job, I reproduced the error in my sandbox environment and voila! i fixed it there myself by following the steps provided by Microsoft – correctly!
So here in this blog, i will share what I did and you have to do yourself if you want to create a Linked Service in Synapse using System-assigned managed identity.
Create and Configure the resources
- Create Azure Synapse if you do not have already. Its your choice to make it public or private network, that is not covered in this blog.
- Make sure you are Synapse Administrator inside the Synapse > Manage section
- Create managed-identity of the Synapse resource of System type.
- Create Azure SQL Database in Azure in same region and subscription.
- Make sure you are Entra ID Admin of that SQL DB.
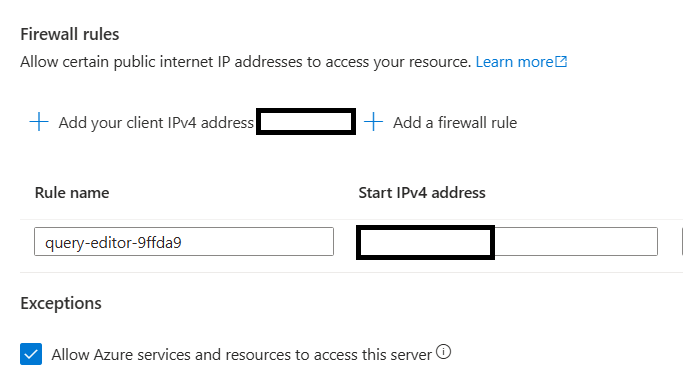
- Make sure Azure services are allowed to communicate with Synpase under firewall settings of the SQL.
Create a “Contained Database User”
What is “Contained Database User”? This question also came to my mind and yes Microsoft answered it in their document. This is a kind of user inside the DB which solely has permission to that database only and in our case when we are trying to authenticate via System-assigned managed identity, we will be creating one to be used in the DB and assign “db_datareader” role. The name should match the name of the system-assigned managed identity.
Run the following script in the database to create and assign permission to Contained Database User:
Create user [<NAME OF SYSTEM-ASSIGNED MANAGED IDENTITY>] FROM EXTERNAL PROVIDER
EXEC sp_addrolemember 'db_datareader', '<NAME OF SYSTEMASSIGNED MANAGED IDENTITY>'
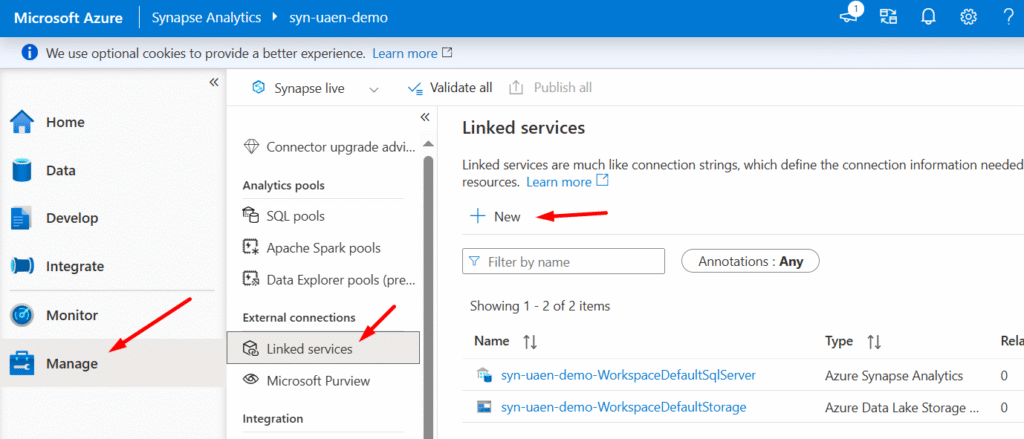
Create Linked Service in Synapse
- Sign in to your Azure
- Go to Synapse workspace
- Click Manage in left-navigation > Linked Service > Add
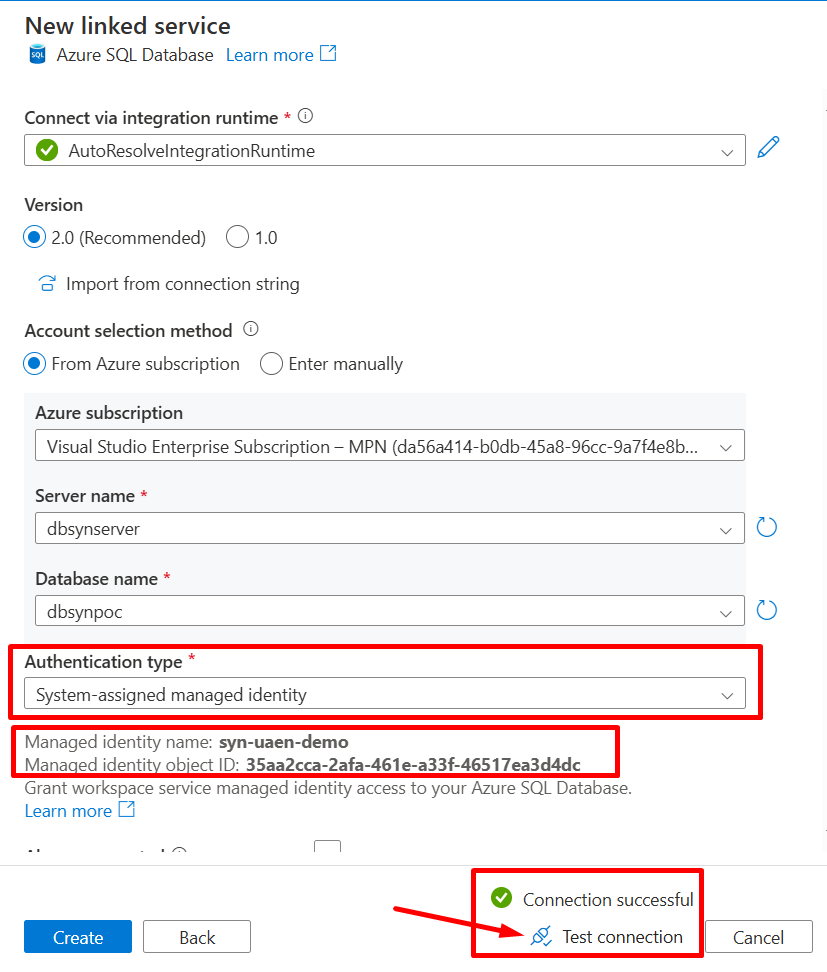
- Search for SQL Database
- Provide all the information and make sure to select Authention Type as System-assigned Managed Identity.
- Once all information is provided, before creating, hit the Test Connection button to test your connectivity. You will see the Connection Successful message! (if you followed the steps correctly).
Some references by Microsoft which you may find helpful while creating the Linked Service in Synapse using System-assigned managed-identity.
https://learn.microsoft.com/en-us/azure/synapse-analytics/synapse-service-identity
Happy learning!